
All Hegel amplifiers with OLED displays like shown above have a Device Menu.
In the menu, you can find useful information and settings.
Please see the expandable articles below.
How to enter the menu

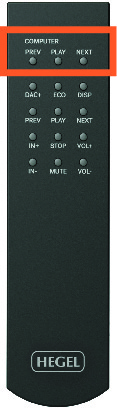
Enter the device menu - Press and hold the Play button on your remote control or the source knob on the amplifier for around 5 seconds.

Navigate the menu - Move up/down by using Prev/Next buttons on the remote or by turning the source knob on the amplifier.
*With the RC10 remote you can also use the Vol+ and Vol- buttons to navigate up and down.
Select items or enter sub-menus – Press Play on the remote or press the source knob on the amplifier.
Exit the menu – Navigate to the bottom of the menu and select Exit.

You can also turn the volume knob on your product, or wait until the menu times out on its own (usually around 30 seconds).
Info
Here you will find information about the Hardware Version of your product and the Firmware Version currently running.| Info | Press Play or the source knob to see more detailed technical information, including the serial number, of your Hegel device |
In this submenu, you can not make any changes.
It is for information purposes only.
Sleep
Newer Hegel products are equipped with an Auto Standby / Sleep function. This makes the product automatically switch itself off after 15 minutes without music, or with very low signal on the speaker outputs.In the Sleep submenu, you can change the time it takes before the product goes into sleep mode, or you can turn the function completely off.
| Sleep | Press Play or the source knob to toggle between 15 minutes, 1 hour, or off |
Auto In
The Auto Input feature enables the amplifier to automatically switch to inputs with incoming digital signals. The feature works on optical, coaxial, BNC, and network inputs.Several user-defined settings are available to customize how the amplifier reacts when receiving a digital signal. Some or all of these can be activated at the same time depending on your preferred use.
Selected input
When you select an input with either the remote or the source knob on the amplifier, this input is defined as the user-selected input. This is the input that the amplifier will choose when powering on and it is the input that the amplifier will revert to when enabling the LAN Back and Dig Back features.
Wake on LAN
When enabled, the amplifier wakes from standby when you start streaming to it using one of the supported streaming services.
| LAN Wake | Press Play or the source knob to toggle between Enabled and Disabled |
Note: When activated, updates will download and install when the amplifier is in standby. On the rare occasion that a critical update is issued, it will be downloaded and installed immediately even if the amplifier is in use. When deactivated, the amplifier will look for, download, and install updates during the power down procedure.
LAN Back
When enabled, the amplifier will return to the last user-selected input when the streaming source is disconnected on the network input.
| LAN Back | Press Play or the source knob to toggle between Enabled and Disabled |
Wake on Digital
When enabled, the amplifier wakes from standby and switches to the digital input receiving a new digital signal.
| Dig Wake | Press Play or the source knob to toggle between Enabled and Disabled |
Note: When the amplifier is powered down, it will note which digital inputs have an incoming signal. These signals will not wake the amplifier again. Only new incoming digital signals will wake the amplifier.
Digital Auto Select
When enabled, the amplifier switches to the digital input receiving an incoming digital signal.
| Dig Auto | Press Play or the source knob to toggle between Enabled and Disabled |
Note: If an analog input is selected, the amplifier will only switch to a digital input if a new digital signal is detected.
Note: If a digital input is selected, the amplifier will only switch to another digital input if there is no signal on the selected digital input. The amplifier will then switch to the first input with an incoming digital signal.
Note: The amplifier will search for an incoming digital signal in a fixed order: 1) BNC, 2) Coaxial, 3) Optical 1, 4) Optical 2, 5) Optical 3.
Digital Back
When enabled, the amplifier will return to the last user-selected input when it no longer receives a signal on the currently selected digital input.
| Dig Back | Press Play or the source knob to toggle between Enabled and Disabled |
Display
| ON/OFF | Press Play or the source knob to toggle between Display default ON and Display default OFF |
| Brightness | Press Play or the source knob to toggle the display brightness between Maximum, High, Medium, and Low |
Note: When off, the display will light up momentarily when changes are made to the input or volume, or when pressing DISP on the remote. You can also toggle between On and Off by pressing and holding DISP on the remote for 3 seconds.
Volume
Maximum volume
To prevent the volume from getting too loud, a user-defined volume level may be used as the amplifier’s maximum output volume.
| Max Vol+ | Press Play or the source knob repeatedly to increase the maximum volume |
| Max Vol- | Press Play or the source knob repeatedly to decrease the maximum volume |
Note: With maximum volume enabled, the volume scale will still go from 0-100. For example, if you set the max volume at 70, the scale will still go to 100. However, 100 will now be the same volume level as 70 was before you made the adjustment. The volume limitation is indicated as 100 Damped when turning the volume to 100. These settings are also shown in the menu.
Startup Volume
When powering on the amplifier, the volume will automatically be set to the same level as when the amplifier was switched off. To prevent the amplifier from powering up at an unwanted volume level, it is possible to set a user-defined max start-up volume.
| Startup+ | Press Play or the source knob repeatedly to increase the startup volume limit |
| Startup- | Press Play or the source knob repeatedly to decrease the startup volume limit |
USB Volume
It is possible to control the volume of the amplifier from most computers and many USB devices.
| USB Vol | Press Play or the source knob to toggle between Enabled and Disabled |
Warning: When using the USB input with USB Volume activated, always remember to check the computer or connected device volume setting before pressing play.
The amplifier will change its volume to the volume setting on the computer or connected device.
Remotes
This feature lets you integrate your Hegel device with your TV, letting you control the Hegel volume with your TV remote and automatically turn on your Hegel device to the TV input. For a detailed introduction, please see this video.
The feature works with most newer Samsung, Sony, LG, and Philips infrared (IR) and Smart TV remotes. Performance may vary between remotes.
Note: To turn off your Hegel device with a set up TV remote, depending on Hegel model, either press mute 3 times or press and hold mute.
Getting started
1. Connect your TV to the Hegel amplifier with an optical or coaxial cable.
2. Enter your TV’s settings menu and go to “sound”, “speaker” or “audio” settings.
3. The sound output should be set to “optical” or “digital out”.
4. The sound signal should be set to “PCM” or “stereo”.
5. If available, deactivate the internal TV speakers.
6. Turn on a program/show/movie on your TV and switch the Hegel amplifier to the input you connected the TV to. Make sure there is sound coming from the speakers.
7. If no sound, please try changing the output settings again.
8. If dropouts in sound, please connect to the Optical 3 input.
Note: The setup procedure varies from brand to brand. Please consult your TV manual for detailed instructions.
Note: Make sure your TV remote is fully charged or has new batteries installed.
Setup IR Remote
1. Enter the sub-menu by pressing the Play button or the source knob.
2. Select “Detect” by pressing the Play button or the source knob to start the IR detection.
The message “No valid signal received” will show until a supported IR remote signal is received.
3. Press some buttons on your TV remote while pointing it at the Hegel device.
When the Hegel device receives a supported infrared signal, the message “Samsung/Sony/LG/Philips verified. Remote activated!” appears on the display of your Hegel device. Your TV remote is now set up with this feature’s default settings.
To customize this feature to fit your preferences, please see the Advanced Settings pane.
4. To store your settings, exit the menu by scrolling to the bottom and selecting “Back”.
Note: If the “Remote Activated” message does not appear after testing multiple buttons on your remote, you either have an unsupported remote or a Smart remote that needs additional setup. If you have a Smart remote, please see the Setup Smart Remote pane.
Note: If the Hegel device responds to the TV remote but there is no sound, try changing the sound output in the TV’s settings menu. The setting should be changed to “optical” or “digital out” and the signal should be “PCM” or “stereo”. Please consult your TV manual for detailed instructions.
Setup Smart Remote
1. Enter the sub-menu by pressing the Play button or the source knob.
2. Select “Detect” by pressing the Play button or the source knob to start the IR detection.
The message “No valid signal received” will show until a supported IR remote signal is received.
3. To configure your Smart Remote, enter your TV’s menu.
4. Enter the remote setup menu.
5. Set up your remote as a universal remote.
6. Choose to set up a universal remote for either a Samsung or Sony home cinema system.
7. Select “optical output” as the connection to the TV.
8. Once this is set up you will be presented with a number of different remotes, one of which should work on the Hegel device. Point the TV remote at the Hegel device.
9. Try the different remote options presented in your TV’s menu until the message “Samsung/Sony verified. Remote activated!” appears on the display of your Hegel device.
10. Save the universal remote configuration in the TV’s menu. Your TV remote is now set up with this feature’s default settings.
To customize this feature to fit your preferences, please see the Advanced Settings pane.
11. To store your settings, exit the menu by scrolling to the bottom and selecting “Back”.
Note: Smart remotes from unsupported brands may still be able to control your Hegel device. If they have the right Samsung or Sony home cinema IR codes stored in their library, they should be able to work.
Note: The Smart remote setup procedure varies from brand to brand. Please consult your TV manual for detailed instructions.
Note: On Samsung TVs with a OneConnect box, make sure the OneConnect box points toward the amplifier during setup. When set up, it needs to be in the line of sight of the Hegel amplifier to work. Experiment with placement to ensure good transmission of the IR signals.
Note: If the Hegel device responds to the TV remote but there is no sound, try changing the sound output in the TV’s settings menu. The setting should be changed to “optical” or “digital out” and the signal should be “PCM” or “stereo”. Please consult your TV manual for detailed instructions.
Advanced Settings
Auto-wake
When the auto-wake feature is activated, the Hegel device will wake from sleep when the volume is adjusted with the TV remote.
When waking from sleep, the input defined as TV input will be selected. If no TV input is defined, the amplifier will wake from sleep to the last input used. Input configuration is done in the Auto-in submenu.
When enabled, this feature also allows you to set the device to standby mode. This is done by pressing the TV remote’s mute button 3 times in a row.
Note: The Auto-wake function is only available for Hegel devices with standby.
Auto-in
By default, Optical 1 is selected as the TV input. The amplifier will automatically switch to this input when the volume is adjusted with the TV remote.
By pressing Play or the source knob you can toggle through and select the different inputs available.
Select the input you have connected your TV to.
You can choose between Coaxial, Optical 1, Optical 2 Optical 3, or Deactivated
If deactivated, the TV remote will control the volume on all inputs of the Hegel amplifier without switching to a specific input.
Clear
Clears all TV remote settings.
Setup Apple TV
It is possible to set up your Apple TV (Siri) remote to control your Hegel device. For this, you will need a TV remote control from either Samsung, Sony, LG, or Philips.
1. Set up the Hegel following the instructions in the pane “Setup IR Remote” or “Setup Smart Remote”.
2. On your Apple TV, go to Settings > Remotes and devices > Volume control > Learn new device.
3. Follow the instructions on the screen to teach Apple TV your TV remote’s buttons.
4. Give the remote configuration a name.
5. Your Apple TV (Siri) remote now acts as a TV remote and can control the Hegel.
Note: If you do not have a TV remote from any of the supported brands, maybe you can borrow one from your dealer or a friend. The setup is done once and after that, you will not need the TV remote on hand.
Note: You can also program the Apple TV (Siri) remote to transmit Hegel remote codes. This will allow you to control the volume and mute on your Hegel amplifier, but it will not enable Auto-wake and Auto-in.
Note: This works with Apple TV 4K and Apple TV HD that uses Siri Remotes. Apple TV 1st, 2nd, and 3rd generation products does not have this learning feature.
HT
In the HT submenu all inputs can be configured to act as a Home Theater input.This will set the inputs' volume at a fixed high volume level.
Activate this feature when you want to use the volume control of a connected device.
Typically a home theater amplifier or external streamers or multi-room controllers.
WARNING: Activating Home Theater sets the volume at a high fixed level. This may
harm your speakers if a fixed level input is connected. Only connect devices with a volume control and make sure the volume of the connected device is turned down low.
| HT | Press Play or the source knob to enter this submenu |
Now navigate to the input you want to change.
| XLR Analog BNC Coaxial Optical |
Press Play or the source knob to toggle between Normal volume control or Fixed high volume level |
Your changes will take effect the next time you select one of the changed inputs.
DAC-Loop
Several of Hegel's amplifiers come equipped with a DAC-Loop function. This function makes it possible to upgrade the digital inputs of the amplifier with an external high-end DAC.*Only amplifiers with a digital output have DAC-Loop. If you don't see a DAC-Loop submenu, your product is not equipped with this feature.
| DAC-Loop | Press Play or the source knob to enter this submenu |
Connect the cables
Before activating, make sure you have connected the external DAC correctly.
Amplifier Digital Output > DAC Coax or BNC digital Input
DAC XLR Output > Amplifier XLR(1) Input
Make sure your DAC is set to the connected input.
| Activate | Press Play or the source knob to turn DAC-Loop ON or OFF |
In the DAC-Loop submenu, you can also enable the digital output to always be active.
| Dig Out | Press Play or the source knob to enable or disable Digital output always on |
For more information on the DAC-Loop function, please refer to your product's user manual.